Sunday, December 31, 2017

XMRemoteRobot - movement achieved with "inchworm gait"


Snake Robot hardware milestone today -  reliable ongoing operation responding to servo commands. Now we have a testbed, the first programming exercise is the "inchworm" gait which is the simplest of snake robot "gaits".

The biggest challenge in the last 3 days has been the head section intermittently going dead as its Arduino Nano microcontroller resets itself. After a lot of detective work I tracked it down to momentary voltage drops. The power supply to the forward section was through thin wires that gave a voltage drop from about 5.3V to 4.8V. There were extra momentary voltage drops when servos came under load and that caused the microcontroller resets. The fix was to run a second parallel pair of wires, V+ and GND from the regulator on Rib05 to the power board on Rib02. That may not be the full story because adding these similar thin wires resulted in a minimal voltage drop rather than halving the effect as expected. It is therefore a good idea to check sections in detail for an unexpected resistance effect.

Tuesday, December 26, 2017

XMSnakeRobot - waggles its head and tail


Youtube video. Testing starts with hand-typing simple command signals.

XMSnakeRobot - we have digital control - 20 out of 20 servos responding.

Milestone tonight (Tue, 26 Dec 2017).
The snake robot "spinal cord" is working. That is 20 servos are responding to remote signals as planned.

Looking at my previous issues of "rogue" servo movements.

Try changing from Arduino Nano to Wemos D1 - a different microcontroller.
I did that - a major change, and the servo bad behaviour was THE SAME!. This prompted me to look harder at my code. After digging deep I did find a "bug". Coding fix gave a successful system fix.

Working on other issues.

Issue: One Arduino also resets itself when servos encounter loads like lifting the snake robot's head.
That head section has 40cm of thin cables supplying power from the centre of the Snake Robot. These have a significant voltage drop - typically 5.1 volt dropping to 4.8 V with momentarily dropping lower when servo loads kick in. 
I got a small improvement by cranking up the regulator to 5.4V. 
I got a further improvement by adding a 470uF capacitor and 39 ohm resistor to the Arduino Nano power supply cable - all good on individual servo testing [LATER - resets still happening on multi-servo movements trying out movement "gaits"]

Hypothesis: Try the "volatile" coding keyword for my servo array.
Made no difference. Also "volatile" triggered a compile error with the Wemos board. That puts a stop to trying "volatile" because I want to leave the way open to using Wemos boards.

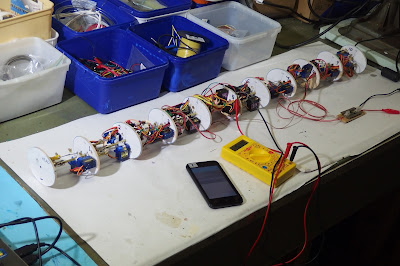
Photo: Snake Robot as at 26 Dec 2017.


Photo: The Android Smartphone is running app "Serial Bluetooth Terminal" by Kai Morich.
Signal "A2+020" = "Target microcontroller 'A', Target Servo 2, Set to +20 degrees from centre position."


Saturday, December 23, 2017

XMSnakeRobot - HC-05 problem solved - needs clean switch-on

Keywords: HC-05, problem, erratic, will not switch on, fail, dead, intermittent, fault, electronic module.

On changing to an external power supply I found that the HC-05 module would not start when I "switched on" by connecting an alligator clip. Then I observed that if I touched the alligator clip to the battery terminal the HC-05 would switch on OK. But the usual clamping it on - no! After some playful experimentation I found a consistent pattern. The HC-05 needs a definite clean change from off to on. Clamping an alligator clip gives a moment of touching and movement which gives an on-off-on-off-on-off-on way of starting electrical life in my circuit. I should solder a proper switch into the snake robot external power leads. In the meantime I have worked out an alligator clipping action where I open the alligator clip, press one side against the terminal then release the other side to clamp.

Hopefully this helps anyone else encountering this mystery!
What is an HC-05? A small circuit board about the size of a human little finger which gives bluetooth capability to device projects - like a snake robot. More about HC-05 here:
http://howtomechatronics.com/tutorials/arduino/arduino-and-hc-05-bluetooth-module-tutorial/

XMSnakeRobot - Servo issues - 13 good channels - 7 do strange dancing

The snake robot -  (link) see photos here - has 20 servos run from 3 x Arduino Nano microcontrollers. As of today 13 of these are working and 7 are mis-behaving. Most common misbehaviour is:

  • Command servo to turn 30 degrees - it turns more than that.
  • Command servo to return to the centre position - it turns in the same direction as before but to its extreme position.

My Arduino code includes code to return all servos to the centre position on reset. This works.
I have tried swapping servos and found that the behaviour is pin-related rather than servo-related.
All 3 Arduino Nanos have the same "sketch" (program code) and similar servos connected. They are misbehaving on different pins.
One Arduino also resets itself when servos encounter loads like lifting the snake robot's head.
[Later - 26 Dec 2017 - that head section Arduino has 40cm of thin cables supplying power. These have a significant voltage drop - typically 5.1 volt dropping to 4.8 V with momentarily dropping lower when servo loads kick in. Fix was to crank up the regulator to 5.35V (small improvement) and add a 470uF capacitor and 39 ohm resistor to the Arduino Nano power supply cable (complete fix).]

Hypothesis: There is a problem with I2C.
I have been trying I2C for the first time so I have put a lot of time into checking that.
Now I have changed to Serial communications with exactly the same effect continuing.
At least I know that I can get I2C to work!

Hypothesis: Servos can cause electrical interference.
I have tried running an Arduino on a separate battery to the Servo power supply. No difference.

Hypothesis: Arduino Nano work overload.
TODO try the  "volatile" coding keyword for my servo array.
The (link) Arduino Reference "Volatile"  - states:
"volatile" -- "Specifically, it directs the compiler to load the variable from RAM and not from a storage register, which is a temporary memory location where program variables are stored and manipulated. Under certain conditions, the value for a variable stored in registers can be inaccurate."
Emphasis mine!
[Later - 26 Dec 2017 - made no difference. Wemos board (see below) would not compile so "volatile" is eliminated because I want to leave the way open to using Wemos boards]

Hypothesis: The Arduino Nano is simply too low powered to handle the work I am giving it and it is "falling to pieces under the stress". I have found this forum comment:
(link) desmondcorreia (2011) writes:
I have tested each code independently everything works fine but as soon as i put it together everything goes wrong.
Desmond, You sum up my experience so well!
I do have a WEMOS D1 microcontroller where the specs say it runs at 80 MHz which is a good advance on the 16 MHz of the Arduino Nano. I am considering swapping that in. A little challenging with it being a 3.3 Volt system connecting into my very 5-volt-everywhere snake robot.
[Later - 26 Dec 2017 - changed tail section microcontroller from Nano to Wemos, a major change, and the servo behaviour was the same. This prompted me to do another review of my coding and after digging deep I did find a "bug". Coding fix gave a successful system fix.]

That should be enough to be going on with!

Friday, December 22, 2017

XMSnakeRobot - Good news for current draw. I2C partly working

First results from the ammeter on current draw for this design.
0.5 to 1.0 A depending on servo activity which is however low at this early testing stage.
This is good news as it is less than expected.
One concern was that segments as they move would place nearby segments under load and put servos into a "stall" state where they draw 0.6 A. This is not happening like that. What I am observing is servos under load but responding with rapid "buzzing" correction attempts which average out to a much lower current draw.

-----------------------------
In the previous post I wrote:

Searching .. From Arduio forum thread "I2C with internal pullups"
https://forum.arduino.cc/index.php?topic=369003.0
"Koepel" says: "If  an Arduino is Slave, and it has the power turned off, that will keep the SDA and SCL low via the diodes."

"Koepel" is right. Connecting the "slaves" for a complete test setup gets my servos responding to signals sent via I2C. Unfortunately the responses are not 100 percent reliable. One of my 2 "slave" sub-systems is ok on 7 servos out of 8 so I will inspect that servo. The other "slave" sub-system gives a correct response to less than half of the signals I send. These "slave" sub-systems are built to be almost identical and they run on the same I2C common wires so this is a mystery. I plan to continue with I2C by working for half a day focussing on testing servos - then if not reliable it will be plan B which is to replace I2C with Serial and SoftwareSerial.

Signals explained by example:
"A2+030" - Arduino Nano A, Servo 2, set to 30 degrees from centre position.
"B0-020" - Arduino Nano B, Servo 0, set to minus 20 degrees from centre position.
"C5+000" - Arduino Nano C, Servo 5, set to centre position.

I type these signals into an Android Cellphone running a Bluetooth Terminal app. The snake robot receives these on an HC-05 module which feeds them via Serial to "nano" microcontroller "A". If the signal starts with 'B' or 'C' that microcontroller uses I2C to pass them on to the other "slave" microcontrollers. Photos and more details in the previous post:
https://hitechfromlotech.blogspot.co.nz/2017/12/xmsnakerobot-construction-completed.html

-----------------------------
I have done a little speed up of testing by soldering together an adapter cable set to run the snake robot off an external battery or power supply. The internal batteries are model aircraft LiPo types which need careful charging and setup for each working session. It is faster to get into a testing session by simply "plugging it in to the extension leads" (12 V).


Thursday, December 21, 2017

XMSnakeRobot - Construction Completed - Testing - I2C issues

Snake Robot structure completed and electronics fitted.
Now into testing and modification.
The good news is that all servos are responding to test commands as planned.
The main challenge is that any test command that runs I2C code is causing the Master Arduino Nano to freeze. Here is a rewording for less-specialist readers: The "I2C" consists of 2 wires running the length of the snake which act as its "spinal cord", enabling 3 x electronic circuit boards to "talk to each other".

Searching .. From Arduion forum thread "I2C with internal pullups"
https://forum.arduino.cc/index.php?topic=369003.0

"Koepel" says:
"If an Arduino is Slave, and it has the power turned off, that will keep the SDA and SCL low via the diodes." 
I am testing parts of the snake robot first before powering it all up so I do indeed have "Arduino Slaves" with power turned off. Good candidate.

Some contributors state that I2C needs "pullup resistors". "Budvar" writes"
"I tested I2C with the internal pullups a time ago. My experience is that it doesn't work. I2C works with the pullup ~10k on short distance. Recommended value is ~5k on most devices so internal pullup is unusable."
Suggested values in the posts include 10K, 4.7K and 2.2K. I have added 6.8K pullups.

One contributor, Nick Gammon, has a detailed article with example code on his own website:
http://www.gammon.com.au/forum/?id=10896
Nick Gammon recommends 4.7K. I read this after soldering 6.8Ks into the snake but I will keep this in mind!

The plan is to work through these possible fixes to try to get I2C to work.
If still no go, then "Plan B" is to turn to "SoftwareSerial" on the master Arduino to run separate Serial conversations with the 2 slaves.

Snake Robot structure with version01 electronics in place.


L to R ribs 3, 4, 5. Rib04 has the highest complexity
because it includes the master microcontroller.

Close up on Rib04 with the "master" Arduino Nano.
Managing the wiring of 20 servos - use of dashes and dots:
Dashes indicate horizontal movement servo, dots for vertical.
Also colour coding. Section Front-Back: orange, white, yellow, green

Rib05, bottom view here, is a battery holder.
Battery mount on the left - regulator and fuse on the right.

Rib05, bottom view, with battery in place


Wednesday, December 20, 2017

XMSnakeRobot - Construction progress

Photos and notes from 16 Dec 2017
Body structure and actuators are now in place.
Making progress on fitting the electronics and cabling.
I am working to a plan - ref Github:https://github.com/manukautech/XMSnakeRobot
That plan is getting many rewrites as I build.
There is a lot of detail problem solving in building this prototype. Especially fitting in components and wiring in such a way that it is possible to easily dismantle a segment for repairs or modifications. It reminds me of my diy past lives building model aircraft and repairing old cars.
  • I found that it is possible to fit battery and regulator on the same rib, rather than on 2 adjacent ribs. That gives a welcome cabling simplification.
  • Allowing for cable flexing on movement turns out to be easier than expected. A simple loop path gives enough room to move and flex.
  • I needed to change the rib cabling hole position to move cables away from the servo swing arms.
  • I needed the equivalent of tiny multi power adapters on each rib to plug in multiple servos and electronic modules. Cutting up a breadboard into micro breadboards with a hacksaw works well.
  • Hair dryer softens glue. I needed to adjust a servo position. Servo was glued in place with "araldite", a two-part epoxy glue. I read that this would soften at about 80 degrees C so I borrowed my daughter's hair dryer and that worked to release the servo so I could re-glue it.


Monday, December 11, 2017

XMSnakeRobot - Skeleton assembly


10 segments and a head piece. XMSnakeRobot assembly on my workbench. Next to fit batteries and electronics.


XMSnakeRobot - A rat-hunting snake robot

The Youtube Video - success with one segment - I am now building and joining 10 segments:

Why a Snake Robot? For hunting rats! Here in New Zealand we have rats etc, alien to these previously isolated islands, harming our much loved native bird populations including the national icon - the Kiwi. Think of a remote controlled small robot in the world of the rat and that world has mud, undergrowth and broken terrain where a snake form factor is worth trying. And we can get "bio-inspired" and realise that snakes are effective bio rat-hunters so it may be good to learn from them. This is an ambitious aim to build towards step by step with an indoor testbed first. If rat-hunting does not work out then there are plenty of other possibilities like robot circus performer and Youtube stardom. If cats can be stars on Youtube then maybe snake robots can be the next big thing!  

When I started this I thought snake robots were a regular thing in robotics and I would be adding value for rat hunting. As far as I can tell there is a lot of snake talk and not so much snake action. As in only a small number exist as one-off academic projects. This places this project more on the "cutting edge" than I expected which is a little scary-snake but also exciting that this can be something special.  

Part of the "Creative Repurposing of Accessible Technologies" Project at the Manukau Institute of Technology in New Zealand.
Here the Accessible Technologies are:
  • Low cost Android SmartPhone or Android SmartWatch for the robot "brain"
  • Arduino Nano microcontrollers for the robot "spinal cord"
  • Bluetooth HC-05 module as the link between "spinal cord" and "brain"
  • SG-90 model aircraft servos - 20 of them. 
  • The snake has 10 segments each of which has servos for horizontal and vertical movement.


XMSnakeRobot is an open source project on Github:


The license is "Apache 2.0" - "A permissive license whose main conditions require preservation of copyright and license notices". For anything mission critical or commercial it is best to check the license to be reassured that the license is supportive of what you want to do. Apache 2.0 has a good track record supporting a lot of projects and components which is why I chose it.